Timing Belt & Seal Replacement - Classic FIAT 124 Spider
Posted by Csaba Vandor on May 28th 2021
How to perform a Timing Belt & Seal Replacement - Classic FIAT 124 Spider
The technical tips listed below are intended to aid in the care of your Fiat 124 Spider and should be used accordingly. They are based on many years of experience but are in no way a replacement for factory recommendations. Seek the professional mechanical assistance for all issues beyond your abilities.
Auto Ricambi, LLC is in no way responsible from the consequences of applying these technical tips. By using (accessing) these technical tips you agree to these terms.
- For easier access, consider removing the radiator. This will allow better access to the front of the engine. This is also a good time to check the condition of the radiator hoses, thermostat, and radiator cap.
- Next remove the alternator belt and the timing belt cover.
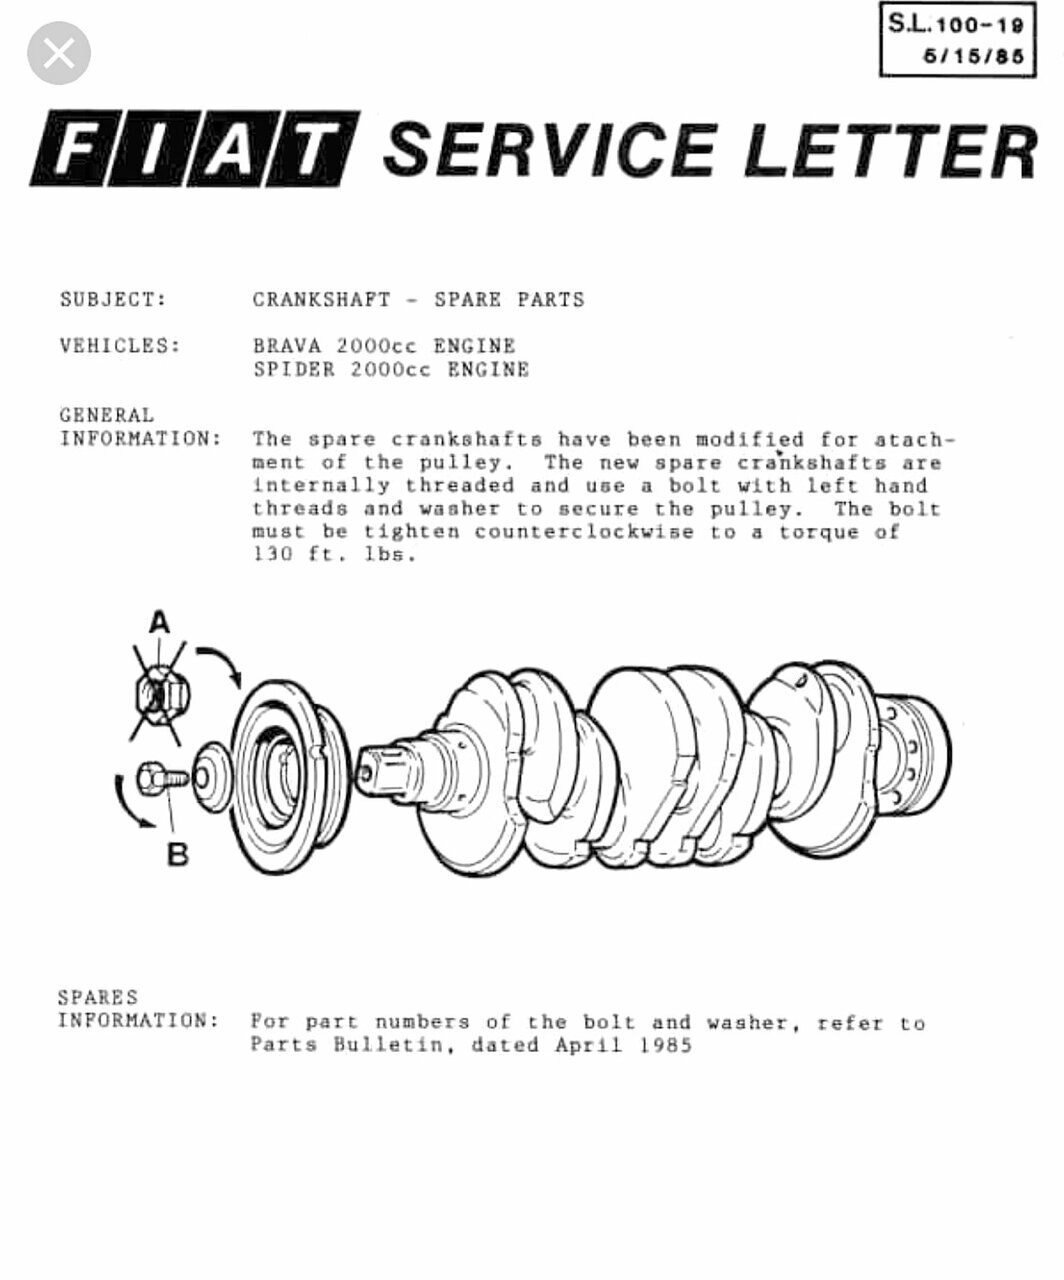
- You will need an impact gun to remove the camshaft and auxiliary shaft gear bolts, plus the crankshaft pulley nut (use a 38mm or 1.5” socket). The crank nut may not budge even with an impact! If it does not want to come off, put a socket on it with a long breaker bar, lay the bar on the driver's side inner fender (protect the fender with a piece of wood 2x4), and crank the engine with the starter for just an instant. The rotation of the engine will undo the nut. *Be certain to do this with the timing belt installed.NOTE: 1983 and newer Spiders have a crankshaft pulley bolt, not a nut, which use a 24mm socket.This is a reverse thread bolt! See Figure B
- Before removing the crankshaft pulley turn the engine so all the timing marks line up to the pointers (The auxiliary shaft pointer should be positioned at 1 o’clock) and loosen the cam and auxiliary shaft gears bolts. Ideally one would loosen the pulley bolts with the timing belt still on, so the gears do not move. Watch out as sometimes the timing gear can slip under the belt. Do not clash the valves into the piston or against each other! If a bolt is stubborn and the gear rotates even with the timing belt installed then you can remove the belt, wrap it all the way around the gear, and hold its ends together with vice-grips. Hold the vice-grips while undoing the bolt with an impact wrench.
- Once all the gears are off, the seals can be removed. One can pry them out with a screwdriver, or punch a hole in them with a nail, and the put a screw in the hole. As the screw in, it will drive the seal out. Be sure to clean up any metal shavings this may have created.
- Coat the inner lip of the new seals with engine oil.Use a large socket to carefully drive them into place. The crank seal may be more difficult, but a little patience pays off. If it is too difficult to install, then remove the seal holder and install it on the bench.
- This is a good time to check the crankshaft timing gear for wear. Because this gear is half as big as the others it usually has more wear.
- Once all the seals are installed reinstall the timing gears and the crank pulley. Use a little blue Locktite on all the bolts and the crankshaft nut.The torque setting in the factory shop manual for the camshaft bolts is 87 ft-lb (118Nm) and for the crankshaft nut it is 180 ft-lb (245 Nm).The 24mm bolt on1983 and newer Spiders are torque to 130 ft-lb.
- Line up the timing marks, lock the tensioner in the loose position (you did get a new tensioner bearing, right?) and install the timing belt. The auxiliary gear points toward the tensioner pivot bolt - or about 1 o'clock position.
- Route the timing belt over the pulleys from bottom to top. You may have to move some of the gears slightly to line them up with the belt.
- Once the belt is installed, release the tensioner and let the tensioner spring take up the slack in the belt. You may need to 'help' the tensioner spring to take out all the slack in the belt. The FIAT manual recommends turning the engine clockwise two revolutions.
- When all the slack is out tighten both the tensioner nut (17mm) to 33 ft-lb (44 Nm) and the pivot bolt (13mm) to 17 ft-lb (24Nm).
Now comes the most important part: by hand or with a wrench, turn the engine over 2 revolutions to be sure everything is lined up well and not clashing.
- After two revolution turn the engine so the crankshaft timing mark lines up.Double check the marks on the other pulleys – they may not be spot on, but should be close
- Reinstall the belt cover, alternator belt, radiator, and bleed the cooling system (see tech article)
Figure A
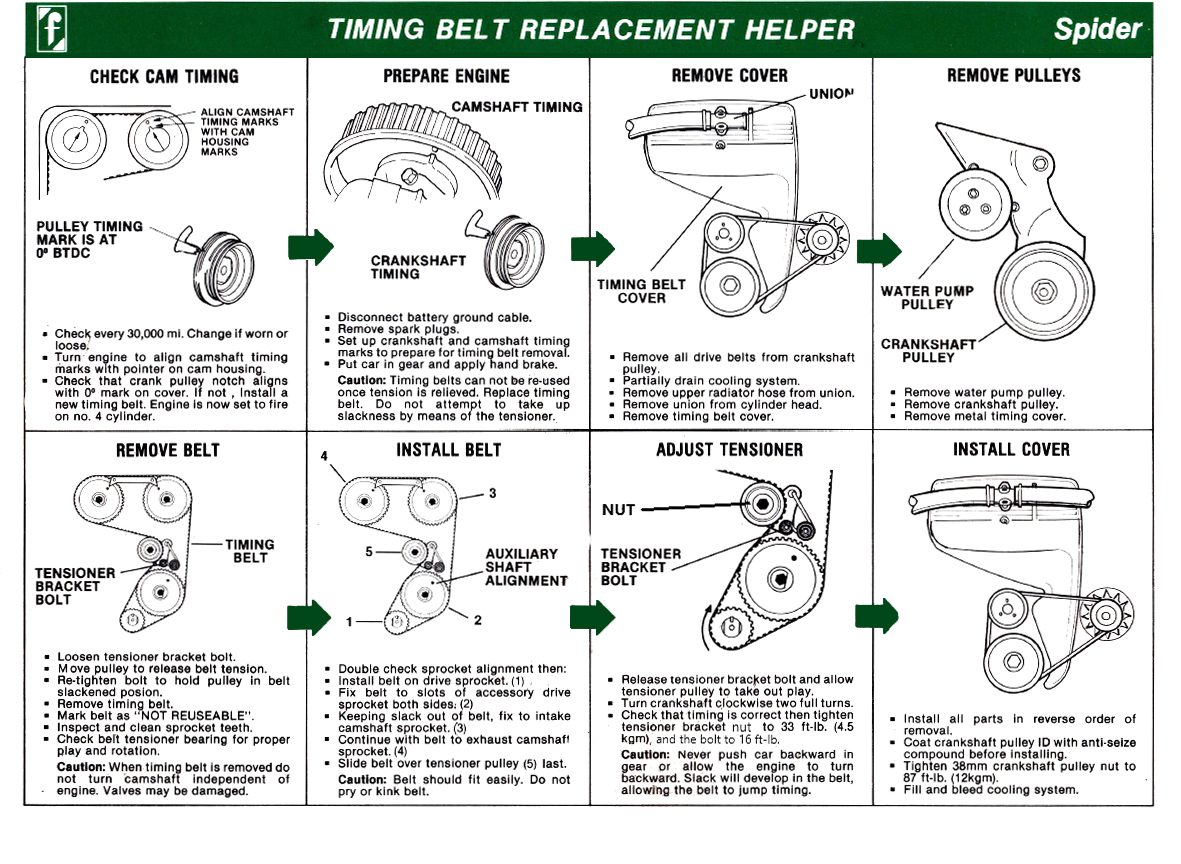
Figure B
Copyright 2020 - Auto Ricambi, LLC